Images have a tremendous amount of power and impact in today’s digital environment. They catch our interest, arouse feelings, and communicate ideas in ways that words sometimes are unable to. With the abundance of photos online, it’s crucial to be able to confirm their legitimacy, learn where they came from, or locate relevant data. Reverse image search is useful in situations like this. This essay will explore the interesting world of Google’s reverse image search and instruct you on how to use this effective tool
Understanding Reverse Image Search
A technique called reverse image search enables you to look for comparable or associated images based on an input image. You start the search utilizing an image rather than text-based inquiries. The purpose of reverse image search is to uncover information about an image, such as its source, related websites, or potential duplicates. It has numerous applications, including fact-checking, identifying objects or landmarks, and exploring the origins of viral images.
Performing Reverse Image Search on Google
Follow these instructions to run a reverse image search on Google:
Access Google Images: Simply click the “Images” button on the Google homepage or visit images.google.com.
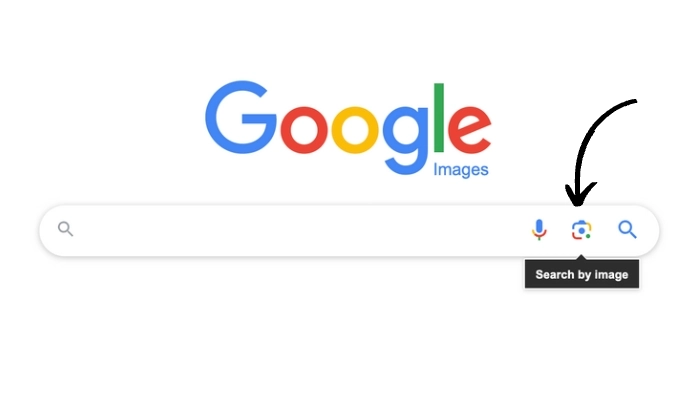
Uploading an image: Click on the camera icon in the search bar to upload an image from your device.
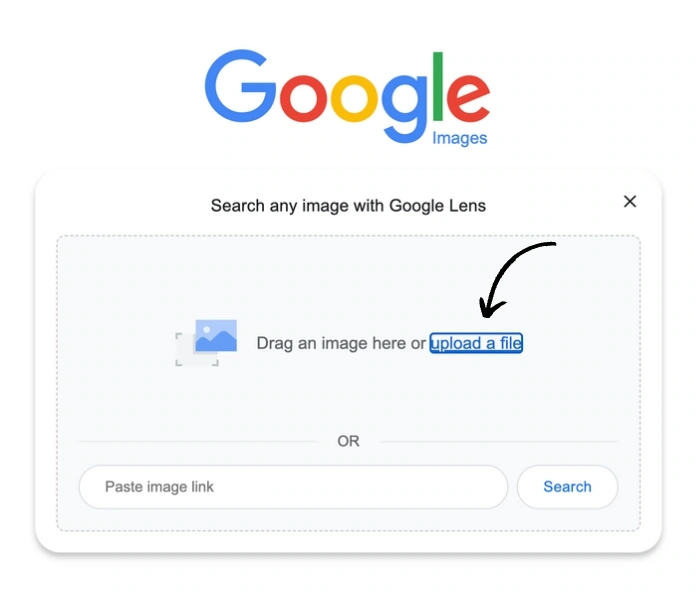
Entering the image URL: Alternatively, you can paste the URL of an image hosted online directly into the search bar.
Using browser extensions and plugins: Install browser extensions or plugins, such as Google Reverse Image Search or TinEye, for convenient access to reverse image search directly from your browser.
Interpreting the Search Results
Google will present a group of search results that aesthetically resemble the submitted image once you start a reverse image search. This is what you may anticipate finding:
- Similar images and visually related results: Google will present images that closely resemble the uploaded image, helping you explore variations or alternative versions.
- Websites and pages featuring the image: You’ll discover websites or pages that include the image, allowing you to gather additional context or information.
- Extracting metadata and additional information: If available, Google may provide metadata associated with the image, such as camera settings, location, or even related articles.
- Identifying potential image duplicates: Reverse image search can help you identify instances where the same image is being used on different websites, which can be useful for detecting image plagiarism or verifying authenticity.
Tips and Techniques for Effective Reverse Image Search
To make the most out of your reverse image search experience, consider the following tips and techniques:
Crop or modify the image: Adjusting the image by cropping or modifying certain elements can yield more accurate search results.
Utilizing advanced search options and filters: Refine your search by utilizing advanced search options, such as specifying image size, color, or file type.
Combining keywords with image search: Enhance your reverse image search by combining relevant keywords with the image to obtain more precise results.
Exploring other reverse image search engines and tools: While Google is a popular choice, there are other reverse image search engines and tools available, such as TinEye, Bing Visual Search, or Yandex, which might provide different results or additional functionalities.
Real-Life Applications of Reverse Image Search
Reverse image search has practical applications in various scenarios, including:
- Verifying the authenticity and source of images: Reverse image search can help you determine if an image has been altered or if it originates from a different context.
- Identifying individuals or objects in an image: By uploading an image containing a person or an object, you can potentially discover their identity or gather more information about them.
- Discovering the origins of viral or shared images: If you come across a viral or widely shared image, a reverse image search can help you trace its origin and uncover its backstory.
- Researching artwork, landmarks, and historical images: Reverse image search can assist in identifying artwork, famous landmarks, or historical images, enabling you to learn more about them.

Reverse Image Search on Mobile Devices
Performing reverse image searches on mobile devices is just as accessible. This is how:
- Using the Google Images app for Android and iOS: The ease of conducting reverse image searches directly from your mobile device is available when you install the Google Images app on your device.
- Third-party apps and alternatives: Explore third-party apps, such as Reverse Image Search, CamFind, or Veracity, which offer reverse image search capabilities and additional features tailored for mobile use.
Privacy and Copyright Considerations
While reverse image search is a powerful tool, it’s essential to consider privacy and copyright implications:
- Respecting intellectual property rights: Ensure that you use images responsibly and respect copyright laws when conducting reverse image searches.
- Understanding privacy implications: Keep in mind that reverse image searches can potentially reveal personal information associated with an image, so it’s crucial to handle such information with care.
- Navigating the ethical use of reverse image search: As a user, it’s important to use reverse image search ethically, avoiding any misuse or harm to individuals or organizations.
Conclusion
Mastering reverse image search on Google opens up a world of possibilities and insights behind every image. Reverse image search is a crucial tool in the digital era for fact-checking, tracing an image’s history, and finding relevant data. You may reveal the mysteries of photos and confidently navigate the huge digital terrain by following the instructions provided in this article and putting the tips and strategies into practice. Embrace the power of reverse image search, and let it be your gateway to uncovering the stories hidden within images.
How to reverse image search on iPhone
Reverse image searches on an iPhone are a practical method to learn more about an image, locate its creator, or find related photos online. The detailed instructions are below if you’re unsure how to use a reverse image search on your iPhone:
Open a web browser: Launch Safari or any web browser you have installed on your iPhone first.
Visit a reverse image search website: There are several websites available that offer reverse image search functionality. For this example, we’ll use Google Images, which is a popular choice.
Access Google Images: In the address bar of your web browser, type in “images.google.com” and tap Enter. This will take you to the Google Images homepage.
Upload or search by URL: On the Google Images homepage, you’ll notice a camera icon within the search bar. Tap on the camera icon to initiate the reverse image search process.
Upload an image: If the image you want to search is saved on your iPhone, select the “Upload an image” option. You’ll be prompted to choose an image from your photo library or capture a new photo using your iPhone’s camera.
Search by URL: Alternatively, if the image you want to search is available online, tap on the “Paste image URL” option. Enter the direct URL of the image you wish to search.
Perform the reverse image search: After you’ve uploaded the image or input the image URL, tap the “Search” button. Following the image’s processing, Google will process your query and return relevant results.
Explore the search results: Google will display a list of search results that include visually similar images, websites where the image appears, and related information. You can scroll through the results to gather more details about the image.
Additional options: You can have more choices depending on the website or search engine you’re using for reverse image searches. These can entail narrowing the search results, modifying your search parameters, or getting access to more image data.
You can simply conduct a reverse image search on your iPhone utilizing a web browser and well-known reverse image search services like Google Images by following these easy steps. This effective tool can assist you in learning more about a photograph, locating its original source, or discovering related photos online.
How can I do a reverse image search without it being saved on Google?
Users can upload an image or offer an image URL to Google’s reverse image search engine, Google Photos, in order to identify related photos or details about the image. Google may retain and examine the photographs you upload when you conduct a reverse image search in order to enhance its services, including image recognition software.
There are a couple of alternatives available. If you wish to conduct a reverse image search without the submitted image being saved on Google or connected to your account:
Use a third-party reverse image search engine: Several alternative search engines offer reverse image search functionality, and they may have different privacy policies compared to Google. Some popular options include TinEye (https://tineye.com) and Yandex (https://yandex.com/images/).
Utilize a virtual private network (VPN): You may increase your online privacy and conceal your IP address by using a VPN service. The photograph will still be saved by Google despite this; however, it will be more anonymous.
Clear your browser cache and cookies: Before performing a reverse image search, clearing your browser’s cache and cookies can assist stop Google from connecting the search to your earlier browsing history. This won’t stop Google from keeping the image itself, though.
Disable Google account syncing: Disabling account synchronization for Google Images while logged into your Google account may assist prevent the search from being recorded in your account’s history.
Consider using an incognito or private browsing mode: Reverse image searches cannot be connected to your current browsing session or saved in your browser history if you open a new incognito or private browsing window.
How to reverse image search on Facebook?
Reverse image search is not a capability that Facebook has included in its platform. However, you may still use outside programs to conduct a reverse image search on pictures from Facebook. You can take the following actions:
Save the image: Right-click a Facebook image and select “Save image as” from the menu that displays to download it. Remember the location of the image’s saving.
Use a reverse image search engine: You can find like or related photos based on the one you have using one of the many third-party reverse image search engines that are accessible. Yandex, TinEye, and Google Images are a few well-liked alternatives.
Google Images: Click the camera icon in the search box at images.google.com. From there, you can launch a reverse image search or upload the previously saved image by entering the image URL.
TinEye: Click on the camera icon in the search box at tineye.com. To run a reverse image search, upload the image from your device or provide the image URL.
Yandex: Please visit yandex.com/images and select the camera icon from the search results. To start the reverse image search, upload the image or input the image URL.
Follow the instructions provided by the reverse image search engine you choose. The engine will analyze the image and provide you with results that match or are visually similar to the uploaded image.
Please note that when using third-party reverse image search engines, their respective privacy policies and data handling practices apply. Be sure to review their policies to understand how they handle your information.
Idea good, it agree with you.
Quite right! It is good thought. I call for active discussion.